Introducción a Astro para Principiantes
Tabla de contenidos
Capítulo 1: Introducción
¿Qué es Astro?
Astro es un framework web de código abierto, altamente personalizable y enfocado en el rendimiento. Es ideal para construir sitios estáticos, blogs e incluso aplicaciones web dinámicas.
Iniciar un nuevo proyecto Astro
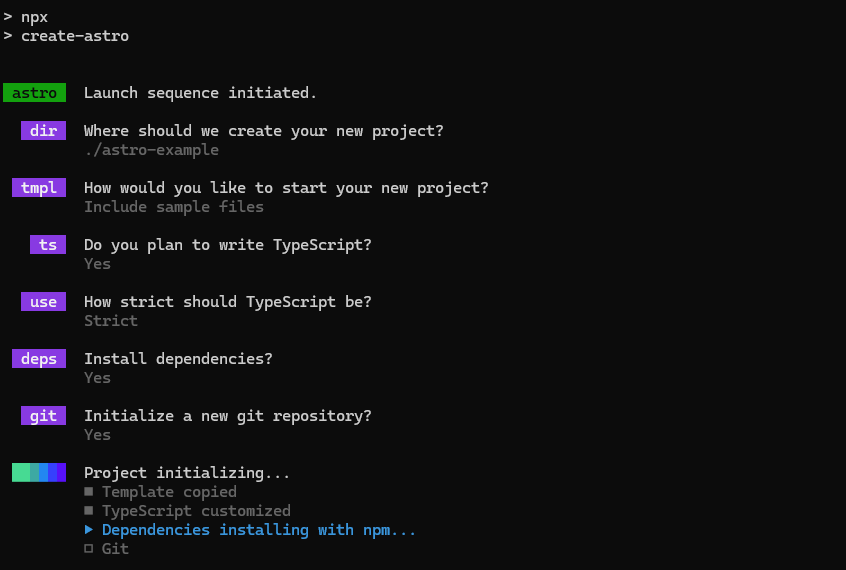
Para crear un nuevo proyecto Astro, puedes usar el siguiente comando:
npm create astro@latest
Después de algunas preguntas, se creará el proyecto. Puedes seguir el ejemplo a continuación:
Estructura de un proyecto Astro
Un nuevo proyecto Astro tiene la siguiente estructura:
.
├── README.md
├── astro.config.mjs
├── package-lock.json
├── package.json
├── public
│   └── favicon.svg
├── src
│   ├── components
│   │   └── Card.astro
│   ├── env.d.ts
│   ├── layouts
│   │   └── Layout.astro
│   └── pages
│       └── index.astro
└── tsconfig.json
Layout
Astro usa un sistema de layout para definir la estructura de las páginas, que puede reutilizarse en otras partes de la aplicación cuando se quiera el mismo diseño de página.
---
interface Props {
  title: string;
}

const { title } = Astro.props;
---

<!-- src/layouts/Layout.astro -->
<!doctype html>
<html lang="en">
  <head>
    <meta charset="UTF-8" />
    <meta name="description" content="Astro description" />
    <meta name="viewport" content="width=device-width" />
    <link rel="icon" type="image/svg+xml" href="/favicon.svg" />
    <meta name="generator" content={Astro.generator} />
    <title>{title}</title>
  </head>
  <body>
    <slot />
  </body>
</html>
<style is:global>
  :root {
    --accent: 136, 58, 234;
    --accent-light: 224, 204, 250;
    --accent-dark: 49, 10, 101;
    --accent-gradient: linear-gradient(
      45deg,
      rgb(var(--accent)),
      rgb(var(--accent-light)) 30%,
      white 60%
    );
  }
  html {
    font-family: system-ui, sans-serif;
    background: #13151a;
  }
  code {
    font-family:
      Menlo,
      Monaco,
      Lucida Console,
      Liberation Mono,
      DejaVu Sans Mono,
      Bitstream Vera Sans Mono,
      Courier New,
      monospace;
  }
</style>
Elementos principales:
Script de Componente(---): Permite importar otros componentes de Astro, componentes de otros frameworks, datos, realizar peticiones, crear variables, recibir props, etc.HTML: Después del script de componente, se define la estructura HTML.<slot />: Es un marcador de posición para el contenido de la página.<style is:global>: Es un estilo global que se aplicará a todas las páginas que utilicen este diseño. Astro está diseñado para facilitar el estilo y la escritura de CSS, permitiéndote escribir tu propio CSS directamente dentro de un componente de Astro.
Páginas
Astro utiliza la extensión .astro para sus componentes. Las páginas son los componentes principales de la aplicación que se renderizarán en el navegador.
Reemplaza el contenido del archivo index.astro con el siguiente código:
---
import Layout from "../layouts/Layout.astro";
---

<!-- src/pages/index.astro -->
<Layout title="Astro Guide">
  <h1>Welcome to Astro Introduction Guide For Beginners</h1>
  <p>Learn how to create efficient and fast websites with Astro.</p>
</Layout>

<style>
  h1 {
    color: rgb(var(--accent));
  }

  p {
    color: white;
  }
</style>
Ejecutar el proyecto
Para probar el proyecto, usa el siguiente comando en la terminal:
npm run dev
La terminal mostrará el siguiente mensaje:
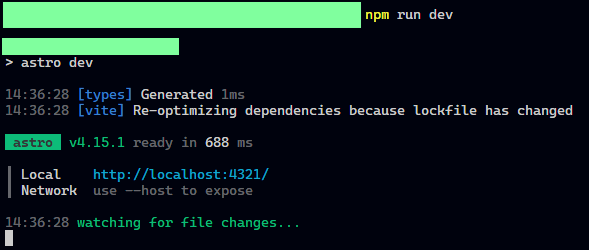
El proyecto estará disponible en http://localhost:4321.
Componentes
Los componentes permiten dividir la UI en piezas independientes y reutilizables. Estos pueden utilizarse en distintas partes de la aplicación.
Modifica el contenido del archivo Card.astro con el siguiente código:
---
interface Props {
  title: string;
  description: string;
}

const { title, description } = Astro.props;
---

<!-- src/components/Card.astro -->
<article>
  <h2>{title}</h2>
  <p>{description}</p>
</article>

<style>
  article {
    background: rgb(var(--accent-light));
    padding: 1rem;
    border-radius: 0.5rem;
    margin: 1rem 0;
  }

  h2 {
    color: rgb(var(--accent));
  }

  p {
    color: rgb(var(--accent-dark));
  }
</style>
Podemos definir las props que el componente recibirá, en este caso, el componente Card recibirá un title y una description. Los valores de las props se extraen del objeto Astro.props.
Puedes renderizar las props en el componente usando llaves {}.
Si quieres usar el componente Card en el archivo index.astro, puedes importarlo y utilizarlo de la siguiente manera:
---
import Layout from "../layouts/Layout.astro";
import Card from "../components/Card.astro";
---

<!-- src/pages/index.astro -->
<Layout title="Astro Guide">
  <h1>Welcome to Astro Guide For Beginners</h1>
  <p>This is a guide to learn how to use Astro.</p>
  <Card title="Card Title" description="Card Description" />
</Layout>

<style>
  h1 {
    color: rgb(var(--accent));
  }

  p {
    color: white;
  }
</style>
Enrutamiento
Astro usa el sistema de archivos para definir las rutas de la aplicación.
Por ejemplo, para crear una nueva página llamada about.astro, crea un nuevo archivo en el directorio src/pages:
---
import Layout from "../layouts/Layout.astro";
---

<!-- src/pages/about.astro -->
<Layout title="About">
  <h1>About</h1>
  <p>This is the about page.</p>
  <a href="/">Go back home</a>
</Layout>

<style>
  h1 {
    color: rgb(var(--accent));
  }

  p {
    color: white;
  }
</style>
La página estará disponible en http://localhost:4321/about.
Para volver a la página de inicio, puedes usar la etiqueta <a href="/">Go back home</a>.
Chapter 2: Astro Islans
¿Qué son las Astro Islands?
Un componente UI interactivo. Múltiples islands pueden coexistir en una página, y cada uno puede usar cualquier framework UI o solo código de Astro.
Using React with Astro
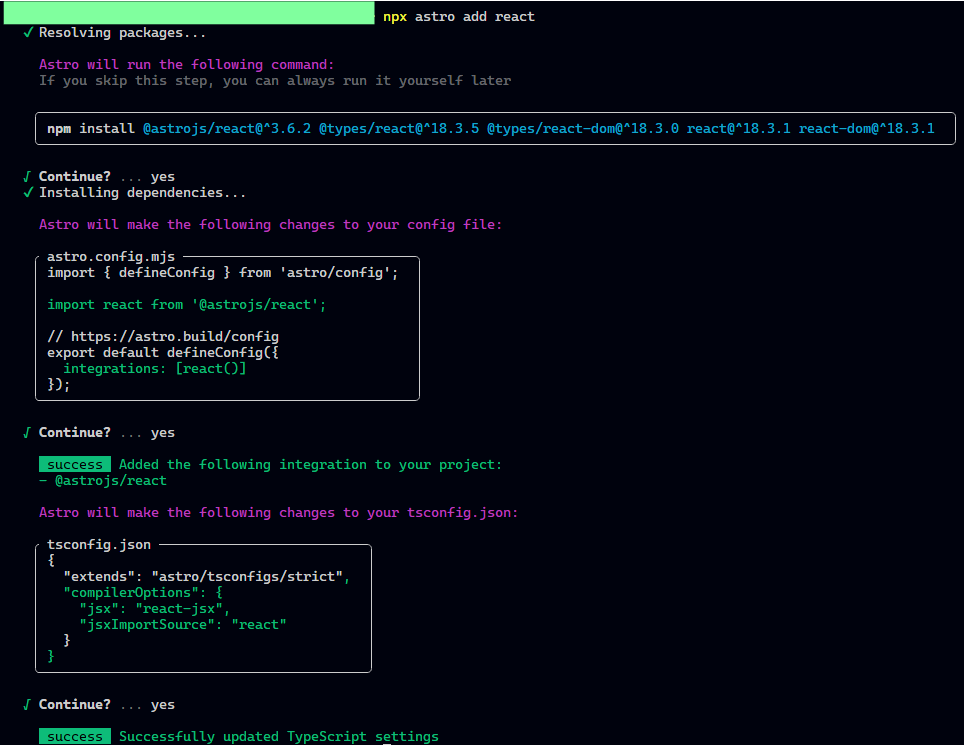
Las integraciones de Astro son fáciles de instalar. Para integrar React con Astro, usa el siguiente comando:
npx astro add react
La terminal mostrará los siguientes mensajes:
Run the project again:
npm run dev
Después, crea el archivo ReactComponent.jsx en el directorio src/components y agrega el siguiente componente de React al archivo:
// src/components/ReactComponent.jsx
const Hello = () => {
    return <h1 style={{ color: "green" }}>Hello from React!</h1>;
};

export default Hello;
Ahora puedes importar el nuevo componente React en el archivo index.astro:
---
import Layout from "../layouts/Layout.astro";
import Card from "../components/Card.astro";
import ReactComponent from "../components/ReactComponent.jsx";
---

<!-- src/pages/index.astro -->
<Layout title="Astro Guide">
  <h1>Welcome to Astro Guide For Beginners</h1>
  <p>This is a guide to learn how to use Astro.</p>
  <Card title="Card Title" description="Card Description" />
  <ReactComponent client:load/>
</Layout>

<style>
  h1 {
    color: rgb(var(--accent));
  }

  p {
    color: white;
  }
</style>
Agrega el atributo client:load al componente React para asegurarte de que solo se renderice en el lado del cliente.
Chapter 3: API Endpoints
Qué son los Endpoints de Astro?
Son custom endpoints para servir cualquier tipo de datos al cliente. Se pueden utilizar para obtener datos de una base de datos, una API externa o cualquier otra fuente.
Uso de los Endpoints de Astro
Neceitarás crear un nuevo archivo en el directorio src/pages/api. A continuación, crea un archivo llamado data.json.ts y agrega el siguiente código:
// src/pages/api/data.json.ts
export async function GET() {
  return new Response(
    JSON.stringify({
      message: "Hello from the API!"
    })
  )
}
Puedes consumir los datos del endpoint en el archivo ReactComponent.jsx que creamos anteriormente.
Agregar el siguiente código al archivo ReactComponent.jsx:
// src/components/ReactComponent.jsx
import { useEffect, useState } from "react";

const Hello = () => {

    const [data, setData] = useState(null);

    useEffect(() => {
        fetch("/api/data.json")
          .then((res) => res.json())
          .then((data) => {
            setData(data);
          });
      }, []);

    return (
    <>
     <h1 style={{ color: "green" }}>Hello from React!</h1>;
     <p style={{ color: "yellow" }}>{data ? data.message : "Loading..."}</p>
    </>
  )
};

export default Hello;
Si deseas ver en el navegador el mensaje de la API, verifica la URL http://localhost:4321/api/data.json, los datos se mostrarán en formato JSON. Esto se debe a que en el nombre del archivo tenemos la extensión .json para indicar el formato de respuesta.
Build y Preview del Proyecto
Para construir el proyecto, para producción, puedes usar el siguiente comando:
npm run build
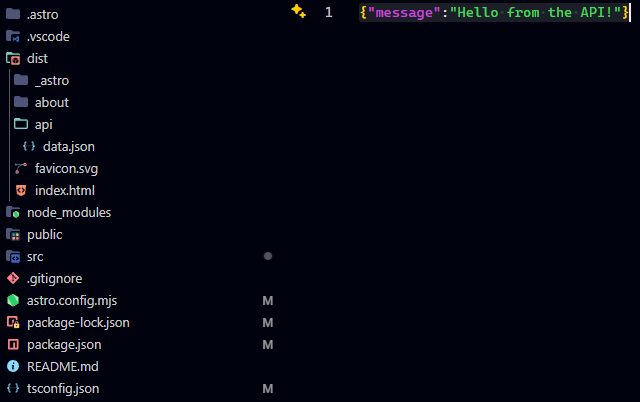
Este comando generará un directorio dist con la compilación de producción del proyecto.
Dentro del directorio dist, puedes ver varios archivos estáticos, incluido el archivo index.html y las demás páginas. Si revisas la carpeta API, verás el archivo data.json con los datos que creamos.
Ahora detén el servidor de desarrollo usando Ctrl + C y ejecuta el siguiente comando:
npm run preview
Este comando iniciará un servidor local similar a lanzar el comando npm run dev (utilizando el mismo puerto), pero servirá la compilación de producción del proyecto.
Conclusión
Astro es una tecnología muy completa, tiene un sistema de enrutamiento muy simple para principiantes, ¡y la sintaxis es increíblemente sencilla!
Espero que encuentres útil esta guía, que puedas comenzar a usar Astro en tus proyectos y que profundices en temas más avanzados.
Si tienes alguna pregunta, no dudes en preguntar a través de las redes sociales.
Happy coding!
Referencias
- Getting started | Docs. (n.d.). Astro Docs. Retrieved September 1, 2024, from https://docs.astro.build
- Vue.js. (n.d.). https://vuejs.org/guide/essentials/component-basics.html
- Drugalya, O. (2020, November 17). Layout Component and why we use it in React. DEV Community. https://dev.to/olenadrugalya/layout-component-and-why-we-use-it-in-react-d8b
¿Te gusta mi contenido? ¡Invítame un café! ☕
Buy Me a Coffee